Running Let's Encrypt behind Apache for WordPress while behind a firewall might sound like a technical challenge, but it's totally doable. If you're diving into the world of web hosting and security, this setup is a game-changer. Let's Encrypt provides free SSL certificates, and when combined with Apache and WordPress, you've got yourself a secure, cost-effective solution. But what happens when your server is tucked away behind a firewall? Don't sweat it—we’ve got your back.
Picture this: you're managing a WordPress site, and you want to make sure everything runs smoothly, securely, and without breaking the bank. Let's Encrypt is your best friend in this situation. But here's the twist—your server is sitting behind a firewall, which can complicate things. Fear not! We’ll break it all down step by step, making sure you understand how to configure everything like a pro.
This article will walk you through the process, from setting up Let's Encrypt to configuring Apache and ensuring your WordPress site stays secure, even with a firewall in place. Whether you're a tech-savvy admin or just starting out, this guide will make sure you're equipped with all the knowledge you need.
Read also:10 Notable Blind People Who Changed The World
Here’s a quick overview of what we’ll cover:
- Understanding Let's Encrypt and its importance
- Configuring Apache for WordPress
- Managing firewalls for SSL certificate installation
- Troubleshooting common issues
Ready to dive in? Let’s get started!
What is Let's Encrypt and Why Should You Use It?
Let’s Encrypt is an open-source Certificate Authority that provides free SSL/TLS certificates. It’s like the ultimate security blanket for your website, ensuring that data between your server and visitors remains encrypted. Using Let’s Encrypt means you don’t have to shell out cash for expensive certificates, and it’s trusted by browsers worldwide.
For WordPress users, having an SSL certificate is crucial. It boosts your site’s credibility, improves SEO rankings, and protects sensitive information like login credentials. Plus, with Let’s Encrypt, you can automate the renewal process, saving you time and effort.
Key Benefits of Let's Encrypt
- Free SSL certificates
- Automated installation and renewal
- Trusted by major browsers
- Open-source and community-driven
Now that we’ve covered the basics, let’s move on to the next step: configuring Apache for WordPress.
Configuring Apache for WordPress
Apache is one of the most popular web servers out there, and it pairs perfectly with WordPress. When setting up Apache for WordPress, you’ll want to ensure that everything is optimized for performance and security. Here’s how you can configure Apache to work seamlessly with WordPress:
Read also:Blue Face Net Worth The Untold Story Of A Rising Trap Star
First things first, make sure Apache is installed on your server. If it’s not, you can install it using the following command:
sudo apt-get install apache2
Once Apache is up and running, you’ll need to configure it to work with WordPress. This involves setting up virtual hosts, enabling necessary modules, and configuring .htaccess files.
Setting Up Virtual Hosts
Virtual hosts allow you to host multiple websites on a single server. To set up a virtual host for your WordPress site, follow these steps:
- Create a new configuration file in the
/etc/apache2/sites-available/directory. - Define the server name, document root, and other necessary settings.
- Enable the virtual host using the command
sudo a2ensite your-site.conf. - Restart Apache to apply the changes.
With your virtual host set up, Apache is ready to serve your WordPress site. But wait—there’s more! Let’s talk about firewalls.
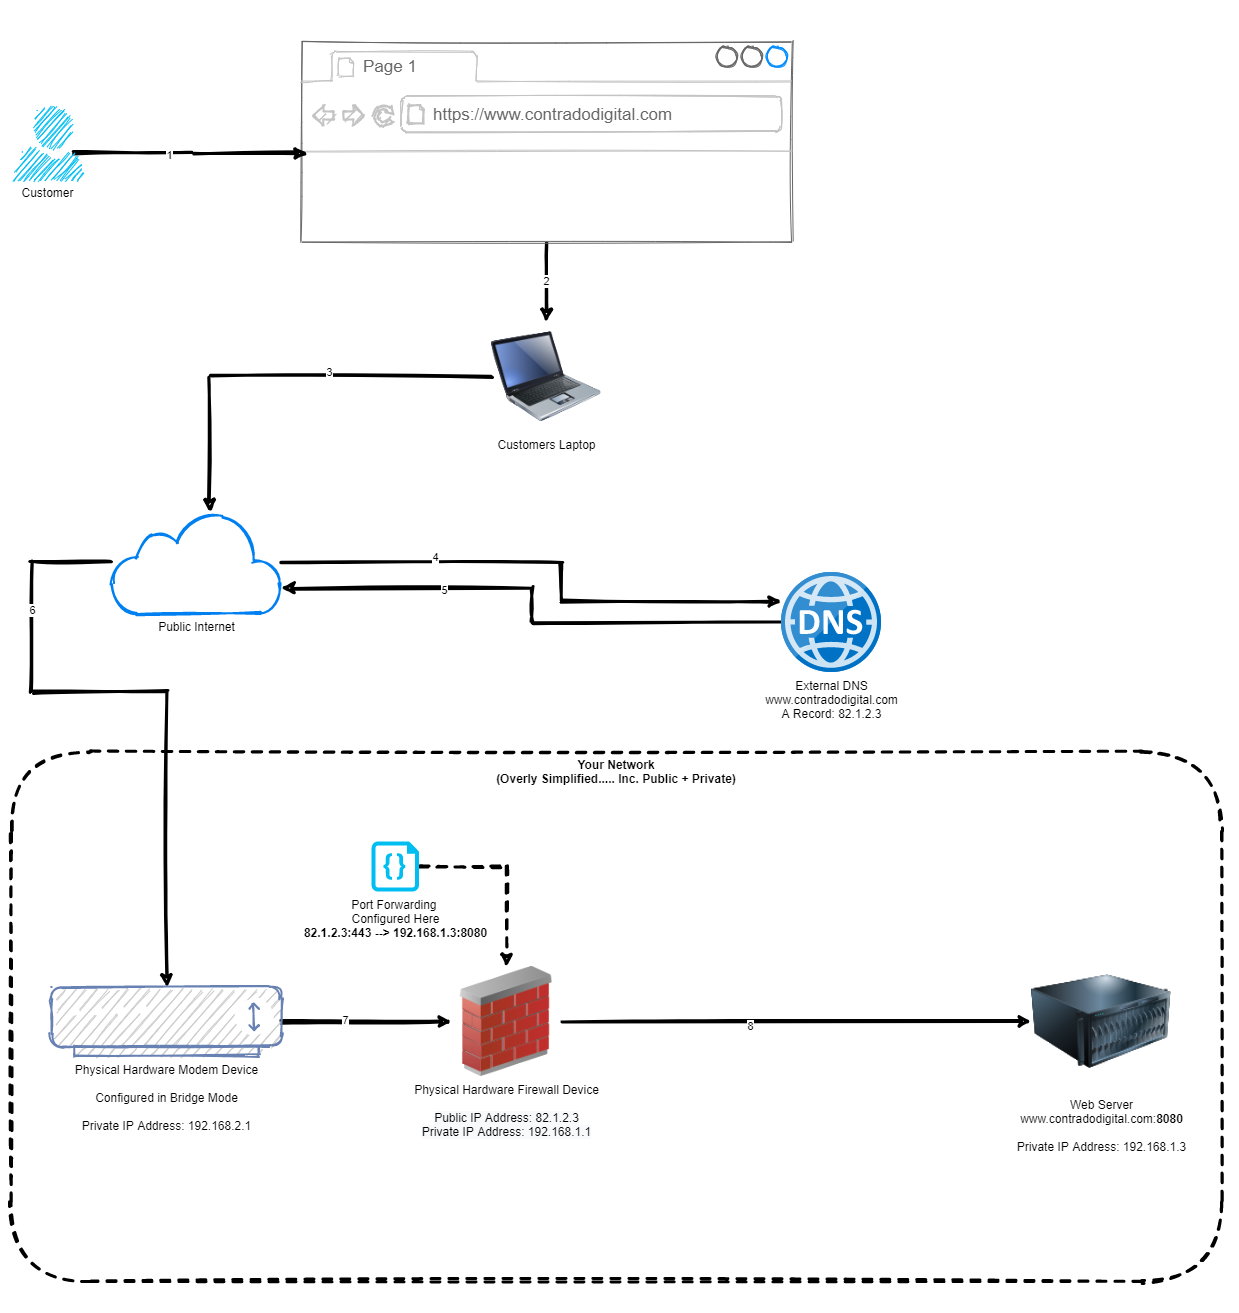
Managing Firewalls for SSL Certificate Installation
Firewalls are essential for securing your server, but they can sometimes block necessary traffic, especially when installing SSL certificates. When running Let’s Encrypt behind a firewall, you’ll need to ensure that the correct ports are open and that the firewall rules are configured properly.
The Let’s Encrypt client, Certbot, communicates with the Let’s Encrypt servers on port 80 (HTTP) and port 443 (HTTPS). If these ports are blocked by your firewall, the certificate installation process will fail. Here’s how you can manage your firewall to allow Let’s Encrypt to work:
Opening Necessary Ports
- Ensure that port 80 and port 443 are open on your firewall.
- Use commands like
sudo ufw allow 80andsudo ufw allow 443if you’re using UFW (Uncomplicated Firewall). - Check your firewall rules regularly to ensure they remain up-to-date.
With the necessary ports open, Let’s Encrypt should be able to communicate with your server and install the SSL certificate without any issues.
Installing Let's Encrypt (Certbot) on Your Server
Now that your firewall is configured, it’s time to install Let’s Encrypt (Certbot) on your server. Certbot is the official client for Let’s Encrypt and makes the process of obtaining and installing SSL certificates a breeze.
Here’s how you can install Certbot on your server:
sudo apt-get install certbot python3-certbot-apache
Once Certbot is installed, you can obtain an SSL certificate for your WordPress site by running the following command:
sudo certbot --apache
Certbot will guide you through the process, asking for your email address, agreeing to the terms of service, and selecting which domains to secure. After a few moments, your SSL certificate will be installed, and Apache will be configured to use it.
Automating Certificate Renewals
One of the best features of Let’s Encrypt is its automated renewal process. Certbot can be configured to renew your SSL certificates automatically before they expire. To set this up, you can use a cron job:
sudo crontab -e
Add the following line to the cron file:
0 0,12 * * * certbot renew --quiet
This will run Certbot twice a day, renewing any certificates that are close to expiration.
Securing WordPress Behind a Firewall
With your SSL certificate in place, it’s time to secure your WordPress site further. Running WordPress behind a firewall adds an extra layer of protection, but it also requires some additional configuration to ensure everything runs smoothly.
Configuring WordPress to Use HTTPS
To fully secure your WordPress site, you’ll need to configure it to use HTTPS. Here’s how you can do that:
- Log in to your WordPress dashboard.
- Go to Settings > General.
- Update the WordPress Address (URL) and Site Address (URL) fields to use HTTPS instead of HTTP.
- Save your changes.
Additionally, you can use a plugin like Really Simple SSL to force HTTPS across your entire site.
Managing Plugins and Themes
When running WordPress behind a firewall, it’s important to ensure that all your plugins and themes are compatible with SSL. Some older plugins and themes may cause mixed content issues, where parts of your site remain unsecured. To avoid this, regularly update your plugins and themes and test your site thoroughly after making any changes.
Troubleshooting Common Issues
Even with the best preparation, things can sometimes go wrong. Here are some common issues you might encounter when running Let’s Encrypt behind Apache for WordPress behind a firewall, along with solutions:
Issue 1: Certificate Installation Fails
If the certificate installation process fails, check the following:
- Ensure that ports 80 and 443 are open on your firewall.
- Verify that your domain’s DNS records are correctly configured.
- Check the Apache configuration files for any errors.
Issue 2: Mixed Content Warnings
If you see mixed content warnings after enabling HTTPS, try the following:
- Use a plugin like Really Simple SSL to fix mixed content issues.
- Search your theme and plugin files for hardcoded HTTP links and update them to HTTPS.
- Clear your browser cache and test your site in an incognito window.
Best Practices for Running Let's Encrypt Behind Apache
To ensure a smooth and secure setup, here are some best practices to keep in mind:
- Regularly update your server software and plugins.
- Monitor your firewall rules and adjust them as needed.
- Set up automated backups for your WordPress site.
- Test your SSL configuration using tools like SSL Labs.
Staying Up-to-Date
Technology is constantly evolving, so it’s important to stay informed about the latest developments in web hosting and security. Follow industry blogs, attend webinars, and participate in forums to keep your skills sharp and your site secure.
Conclusion
Running Let’s Encrypt behind Apache for WordPress behind a firewall might seem daunting at first, but with the right tools and knowledge, it’s a straightforward process. By following the steps outlined in this guide, you can ensure that your WordPress site remains secure, performant, and compliant with modern web standards.
Remember to regularly update your software, monitor your firewall rules, and test your site for any issues. And if you ever run into trouble, don’t hesitate to reach out to the community or consult the official documentation for Let’s Encrypt and Apache.
Now that you’ve got all the information you need, it’s time to take action. Install Let’s Encrypt, configure Apache, and secure your WordPress site today. Your visitors—and your peace of mind—will thank you for it.
Got any questions or tips of your own? Drop a comment below and let’s keep the conversation going!